
Step-by-step guide to deploying AccessPoint in your Microsoft 365 and Azure environment
Last updated: September 03, 2026 by Steve
Deployment Guide
AccessPoint uses a split deployment model: a lightweight SPFx web part in SharePoint, a Teams app that hosts the same web part as a personal tab, and an Azure backend that runs the API and stores all data. Every component lands in your own Microsoft 365 tenant and Azure subscription — nothing is hosted by the publisher, and no customer data leaves your environment.
Overview
| Component | Get it from | Lands in |
|---|---|---|
SPFx web part (accesspoint.sppkg) |
Microsoft AppSource or direct upload to your app catalog | Your SharePoint Online tenant |
Teams app (accesspoint-teams.zip) |
Microsoft AppSource or upload to Teams Admin Center | Your Teams app catalog |
| Azure backend (App Service, SQL, Blob Storage, Application Insights, plus the optional AI, search, OCR, speech, malware-scanning, and media-processing resources) | One-click Bicep/ARM template from the Azure portal (recommended) or scripted Bicep + PowerShell | Your Azure subscription |
For sovereign/government clouds, version pinning, or scripted deployments, all artifacts are also published to https://get.realizer.io/public/accesspoint/latest/.
Install order matters. Install the SharePoint solution before any user opens the Teams personal tab. The Teams app loads the SPFx web part from SharePoint in an iframe — without it, users see a SharePoint 404 inside Teams.
Prerequisites
- An active AccessPoint subscription (get AccessPoint) — the API activates its license automatically using its Entra identity, so no license key is needed unless Realizer Support provides one for your tenant
- An Azure subscription with Contributor (or higher) rights on the target resource group
- A SharePoint App Catalog provisioned in your tenant, plus SharePoint Administrator rights
- Global Administrator or Application Administrator in Entra ID for Graph permission grants and admin consent
- Teams Administrator (or Global Admin) to publish the Teams app
- For scripted or manual deploys: Azure CLI (signed in with
az loginas a user, not a service principal) and the PnP.PowerShell module
No Microsoft 365 licensing tier, Power Platform, or Dataverse dependency exists — any user with SharePoint or Teams access can use AccessPoint.
Step 1: Deploy Azure resources
This step provisions the backend: a Linux App Service (the API), Azure SQL Database, Blob Storage, and Application Insights with Log Analytics. Resources are named {type}-accesspoint-{tenantName} (for example, app-accesspoint-contoso) and are hardened by default (TLS 1.3, Entra-only SQL auth, FTPS and basic auth disabled, Microsoft Defender for SQL on by default). The SQL server is created Entra-first: the deploying user becomes the initial Entra admin and no SQL credential ever exists — there is nothing to rotate or disable.
Weekly "Vulnerability Assessment scan completed" emails showing failing checks, but nothing in the portal? Expected on a fresh deployment, not a vulnerability. Microsoft Defender for SQL runs the classic (storage-backed) Vulnerability Assessment, but the Azure portal's Defender blade now defaults to the newer express configuration view, so the email's "View results" link can land on a view with no scans in it. The failing checks are baseline checks, which fail until the current state is approved as the baseline — the template pre-approves the deterministic VA2065 (firewall rules) check, but a low-severity, tenant-specific user-tracking check on the application database can't be pre-declared. Resolve it once: open the SQL server (not the database) → Microsoft Defender for Cloud → Vulnerability assessment → open the failing check → Approve as baseline → Scan again; subsequent weekly emails report all checks passing.
Option A: Azure portal (recommended). Deploy the AccessPoint Bicep/ARM template one-click from the Azure portal (the Deploy to Azure button). The deployment form collects your subscription and resource group, tenant name (e.g., contoso from contoso.sharepoint.com), and a mandatory Deployment type with no default: pick New installation for a first-time deployment, or Upgrade existing installation when redeploying over a running AccessPoint — the upgrade posture preserves operator-added application settings and leaves database access untouched. Optionally choose an App Service SKU (B1 for evaluation, S1 for standard production, P1v3 default; P2v3 when recordings will be transcoded in-process without the media processing module), an alert email, and the optional capabilities below. Leave the license API key blank — AccessPoint activates its license automatically using the app's Entra identity; only enter a value if Realizer Support provides one for your tenant. The API package deploys into the App Service automatically — after deployment there is no runtime dependency on external services.
Finish Setup (Graph permissions). The template itself never grants Graph permissions. After deployment, open the finishSetupUrl link from the deployment's Outputs and sign in as a Global Administrator — the publisher's Finish Setup page grants every Graph permission the managed identity needs in one idempotent pass. Revisit the same link after an upgrade to pick up newly introduced permissions. Then perform a full Stop/Start cycle on the App Service (not Restart) so the permissions take effect.

Option B: Bicep + PowerShell. For custom pipelines or strict change control, run the deployment script against the published ARM template:
Invoke-WebRequest -Uri "https://get.realizer.io/public/accesspoint/latest/Deploy-AccessPoint.ps1" -OutFile "Deploy-AccessPoint.ps1"

# End-to-end: infrastructure, configuration, and both apps
.\Deploy-AccessPoint.ps1 `
    -SharePointSiteUrl "https://contoso.sharepoint.com/sites/accesspoint" `
    -TemplateUri "https://get.realizer.io/public/accesspoint/latest/main.json" `
    -DeploySharePointApp -DeployTeamsApp
The script auto-detects the deployment type (new installation vs. upgrade) and runs up to seven steps — infrastructure, SQL Entra-only authentication (a backstop: current templates create the server Entra-first), Graph permission grants (the scripted equivalent of the Finish Setup page), an App Service stop/start cycle, the optional SharePoint storage entity (API URL), SPFx API permission approvals, and optional app installs. Each is independently skippable (-SkipInfrastructure, -SkipGraphPermissions, -SkipSharePoint). Pin a version with -ArtifactBaseUrl "https://get.realizer.io/public/accesspoint/2.1.0" for reproducible, integrity-verified deploys (the script checks the published SHA-256 and aborts on mismatch).
To run the infrastructure pieces yourself instead:
$TenantName    = "contoso"
$ResourceGroup = "rg-accesspoint-$TenantName"

az group create --name $ResourceGroup --location "canadacentral"

$deployment = az deployment group create `
    --resource-group $ResourceGroup `
    --template-uri "https://get.realizer.io/public/accesspoint/latest/main.json" `
    --parameters tenantName=$TenantName appServiceSku=P1v3 `
    --output json | ConvertFrom-Json

$appName     = $deployment.properties.outputs.appServiceName.value
$apiUrl      = $deployment.properties.outputs.appServiceUrl.value
$principalId = $deployment.properties.outputs.appServicePrincipalId.value

# Backstop only: current templates create the SQL server Entra-first, so
# Entra-only auth is already in force and no SQL credential ever exists
az sql server ad-only-auth enable --resource-group $ResourceGroup `
    --server-name $deployment.properties.outputs.sqlServerName.value
Graph permission grants. The App Service managed identity needs these Microsoft Graph application permissions: Mail.Send, User.ReadBasic.All, TeamsAppInstallation.ReadForUser.All, Application.Read.All, AppCatalog.Read.All, and (default-on, opt-out) AiEnterpriseInteraction.Read.All for Copilot capture. The easiest path is the Finish Setup page — the finishSetupUrl deployment output — which grants them all in one idempotent pass using a Global Administrator's delegated sign-in. To grant them by CLI instead:
$graphSpId = az ad sp show --id "00000003-0000-0000-c000-000000000000" --query id -o tsv

$permissions = @(
    @{ Name = "Mail.Send";                            Id = "b633e1c5-b582-4048-a93e-9f11b44c7e96" }
    @{ Name = "User.ReadBasic.All";                   Id = "97235f07-e226-4f63-ace3-39588e11d3a1" }
    @{ Name = "TeamsAppInstallation.ReadForUser.All"; Id = "9ce09611-f4f7-4abd-a629-a05450422a97" }
    @{ Name = "Application.Read.All";                 Id = "9a5d68dd-52b0-4cc2-bd40-abcf44ac3a30" }
    @{ Name = "AppCatalog.Read.All";                  Id = "e12dae10-5a57-4817-b79d-dfbec5348930" }
    # Copilot capture (tenant-wide) — granted by default; remove this line to opt out:
    @{ Name = "AiEnterpriseInteraction.Read.All";     Id = "839c90ab-5771-41ee-aef8-a562e8487c1e" }
)

foreach ($perm in $permissions) {
    $bodyFile = [System.IO.Path]::GetTempFileName()
    @{ principalId = $principalId; resourceId = $graphSpId; appRoleId = $perm.Id } |
        ConvertTo-Json | Set-Content -Path $bodyFile -Encoding utf8
    az rest --method POST `
        --uri "https://graph.microsoft.com/v1.0/servicePrincipals/$principalId/appRoleAssignments" `
        --body "@$bodyFile" --headers "Content-Type=application/json" --output none
    Remove-Item $bodyFile
}

# Full stop/start (NOT restart) clears the managed identity token cache
az webapp stop  --name $appName --resource-group $ResourceGroup
Start-Sleep -Seconds 10
az webapp start --name $appName --resource-group $ResourceGroup
Verify: browse to https://<api-url>/api/health and confirm a healthy response.
Optional capabilities
The template exposes several optional capabilities, none required to run AccessPoint. All of them are off unless you enable them at deploy time, except the Copilot capture permission, which is granted by default with an opt-out (the Deploy to Azure form, -p name=value on az deployment, or the Deploy-AccessPoint.ps1 switches noted below control them). Every optional resource is deployed into your own Azure subscription with managed-identity-only authentication and key access disabled — no customer data leaves your tenancy, and Microsoft does not train models on it.
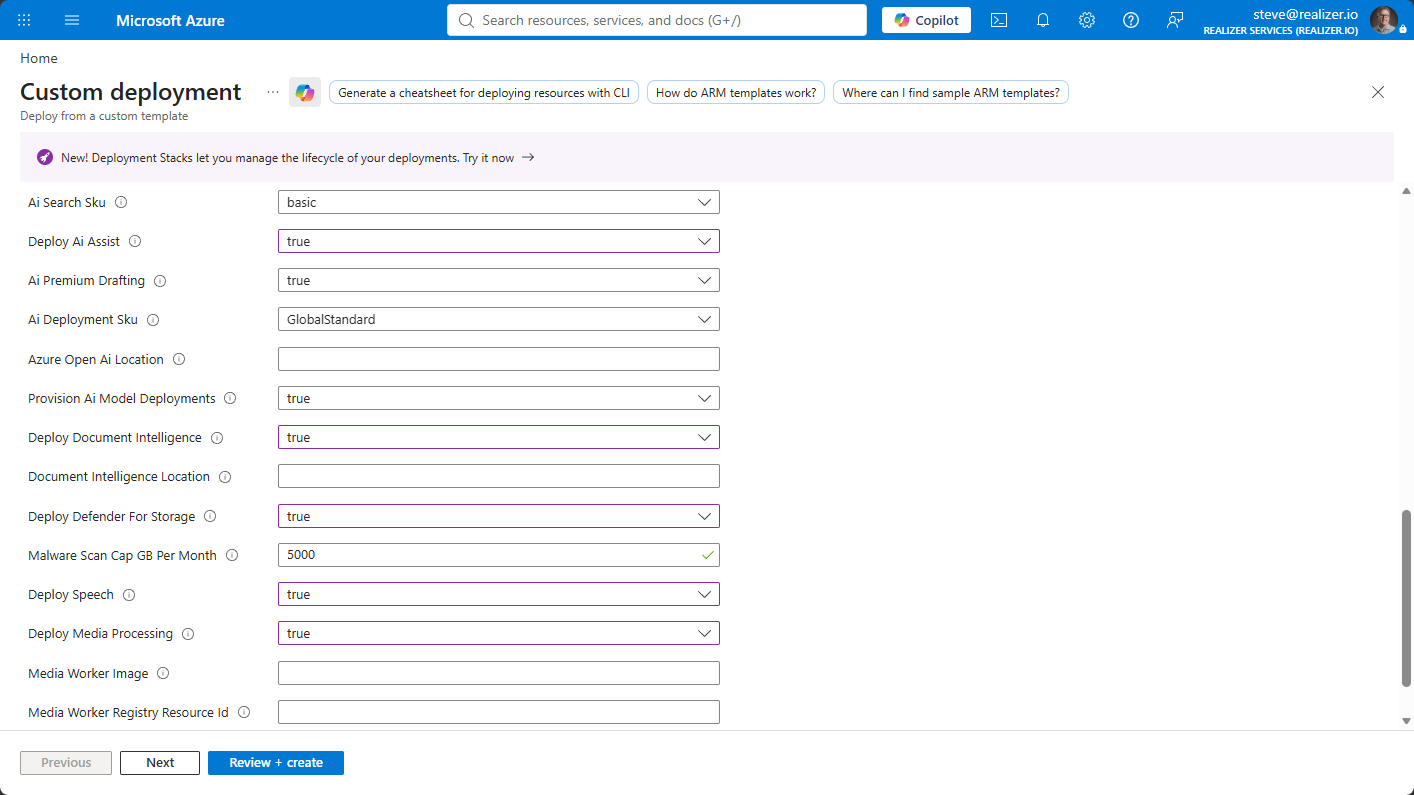
Deploy AI Assist (Azure OpenAI) — adds an Azure OpenAI resource to your subscription with managed-identity auth (no API keys). Billing is pay-per-use, so an idle tenant pays about $0 and a busy department typically spends single-digit dollars per month. Deploying it enables the AI Assist features, each individually switchable under Settings > Features. Every AI output is a suggestion or an editable draft — a person always decides.
Deploy AI Search (
deployAiSearch=true) — adds Azure AI Search so the Documents search box matches words inside documents (extracted PDF text) in addition to names, types, and tags; with AI Assist also deployed it supports semantic search. New documents are indexed automatically, and an Administrator sweep (Settings > Setup > Document content search) indexes any that predate it.Deploy Document Intelligence (
deployDocumentIntelligence=true) — adds Azure AI Document Intelligence for OCR: scanned, image-only documents get their text read so they participate in content search, duplicate detection, AI summaries, and redaction suggestions like any other document. It also powers on-screen text detection in video (sampled frames are read the same way, billed per frame). Billing is pay-per-page (roughly USD $1.50 per 1,000 pages). Without it, scanned documents still match by name, type, and tags.Deploy Speech (
deploySpeech=true) — adds Azure AI Speech for transcripts and captions of video and audio records: time-coded, speaker-labelled, feeding find-in-transcript, content search, duplicate detection, AI grounding, and transcript-anchored redaction proposals. The Speech account reads the audio through its own managed identity — no shared-access token is minted. Billing is per audio hour (roughly USD $0.18) and about $0 when idle.Deploy Defender for Storage (
deployDefenderForStorage=true) — turns on Microsoft Defender for Storage on-upload malware scanning for the documents account. The API mirrors each verdict onto the document and blocks preview, playback, download, and release of anything flagged, which makes scanning part of the release control for native files released as-is. Billed per GB scanned, capped bymalwareScanCapGBPerMonth(default 5,000).Deploy media processing (
deployMediaProcessing=true) — the production-scale media executor: two Storage Queues and a scale-to-zero Container Apps job running the publisher's media worker image, so transcodes, thumbnails, and release rendering leave the App Service. The same job converts very large Office documents and scans. Without it, recordings are processed in-process on the App Service (choose P2v3 forappServiceSku). Billed per vCPU-second while a job runs; about $0 idle. The job pulls a code-only container image — no customer data ever transits the registry. For production, mirror the image into your own Azure Container Registry once per version and pointmediaWorkerImageandmediaWorkerRegistryResourceIdat it, so media jobs never depend on the publisher registry being reachable:az acr create --name <yourregistry> --resource-group <rg> --sku Basic az acr import --name <yourregistry> --source realizer.azurecr.io/accesspoint/media-worker:<apiVersion> --image accesspoint/media-worker:<apiVersion> # deploy with: mediaWorkerImage = <yourregistry>.azurecr.io/accesspoint/media-worker:<apiVersion> # mediaWorkerRegistryResourceId = $(az acr show --name <yourregistry> --query id -o tsv)Re-run the import when you upgrade — the tag follows the API version. Egress-restricted subscriptions must use this path.
SharePoint origin (
sharePointOrigin=https://contoso.sharepoint.com) — adds a blob CORS rule for your SharePoint origin and lets recordings play directly from Blob Storage through one-hour user-delegation links instead of streaming through the API, cutting App Service egress. Leave it empty under network isolation.Copilot capture permission (
AiEnterpriseInteraction.Read.All) — this tenant-wide Graph permission is granted by default so custodians can capture Copilot interaction history via Documents > Add from Microsoft 365 out of the box. It is application-only (Microsoft Graph offers no delegated variant), but AccessPoint only ever reads the signed-in user's own Copilot history. Least-privilege tenants can opt out withDeploy-AccessPoint.ps1 -DisableCopilotCapture(orgrantCopilotCapturePermission=falseon the ARM/Bicep template) and can revoke the app role in Entra ID at any time; the five standard Graph permissions above are unaffected.
Step 2: Install the AccessPoint apps
Install the SharePoint solution first, then the Teams app.
SharePoint solution. From the AppSource listing, click Get it now and approve it into your SharePoint App Catalog, deployed tenant-wide. Alternatively, upload manually (SharePoint Admin Center > More features > Apps > Upload, check "Make this solution available to all sites") or let the script do it.

Teams app. From the AppSource listing, click Get it now and approve it in Teams Admin Center, or install both apps via the script (the signed-in user needs SharePoint admin plus Teams admin or Global admin):
.\Deploy-AccessPoint.ps1 `
    -SharePointSiteUrl "https://contoso.sharepoint.com/sites/accesspoint" `
    -SkipInfrastructure -SkipGraphPermissions `
    -DeploySharePointApp -DeployTeamsApp
Do NOT use SharePoint "Sync to Teams". It silently overrides the manifest's
webApplicationInfo.id, which breaks Teams activity feed notifications. Upload the Teams app directly to Teams Admin Center.
Verify: the solution appears in the app catalog without errors, and AccessPoint shows as Allowed under Teams Admin Center > Manage apps.
Step 3: Approve API permissions
The SPFx package requests delegated permissions that a SharePoint admin must approve. In the SharePoint Admin Center, go to Advanced > API access and approve each pending AccessPoint request: access_as_user on the AccessPoint API, plus Graph scopes for the people pickers and the Add-from-Microsoft-365 capture sources — User.Read.All, Sites.Read.All, Files.Read.All, Mail.Read and Mail.Read.Shared (own and shared/intake mailboxes), Calendars.Read and Calendars.Read.Shared, Chat.Read, ChannelMessage.Read.All, Team.ReadBasic.All, Channel.ReadBasic.All (Teams chats and channels), Notes.Read and Notes.Read.All (OneNote), and OnlineMeetingRecording.Read.All, OnlineMeetingTranscript.Read.All, and OnlineMeetings.Read (recordings and transcripts of Teams meetings the user organized). The .Shared scopes never broaden access on their own — Graph still enforces each user's existing Exchange mailbox permissions.

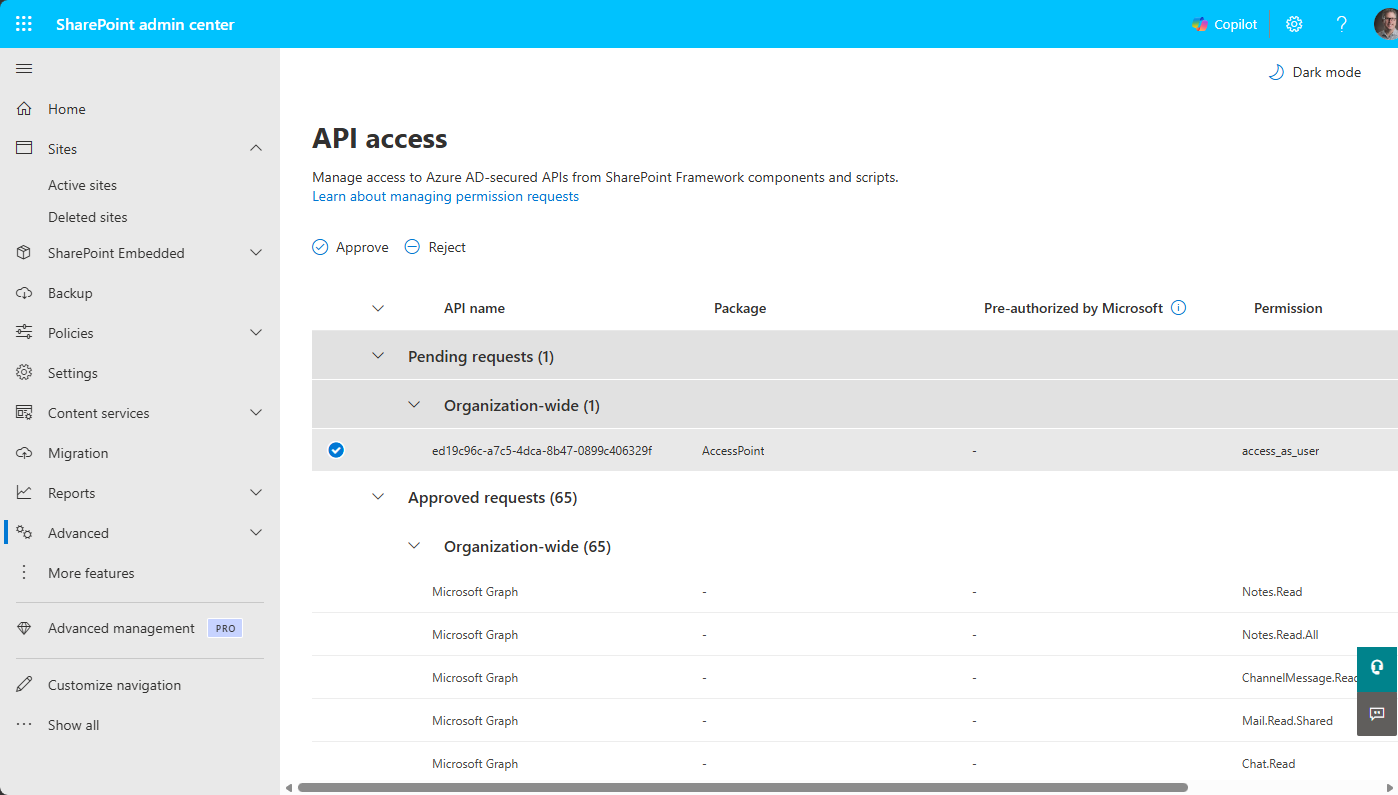
Or approve via PnP PowerShell:
Connect-PnPOnline -Url "https://contoso-admin.sharepoint.com" -Interactive

$spfxPermissions = @(
    @{ Resource = "ed19c96c-a7c5-4dca-8b47-0899c406329f"; Scope = "access_as_user" }
    @{ Resource = "Microsoft Graph"; Scope = "User.Read.All" }
    @{ Resource = "Microsoft Graph"; Scope = "Sites.Read.All" }
    @{ Resource = "Microsoft Graph"; Scope = "Files.Read.All" }
    @{ Resource = "Microsoft Graph"; Scope = "Mail.Read" }
    @{ Resource = "Microsoft Graph"; Scope = "Mail.Read.Shared" }
    @{ Resource = "Microsoft Graph"; Scope = "Calendars.Read" }
    @{ Resource = "Microsoft Graph"; Scope = "Calendars.Read.Shared" }
    @{ Resource = "Microsoft Graph"; Scope = "Chat.Read" }
    @{ Resource = "Microsoft Graph"; Scope = "ChannelMessage.Read.All" }
    @{ Resource = "Microsoft Graph"; Scope = "Team.ReadBasic.All" }
    @{ Resource = "Microsoft Graph"; Scope = "Channel.ReadBasic.All" }
    @{ Resource = "Microsoft Graph"; Scope = "Notes.Read" }
    @{ Resource = "Microsoft Graph"; Scope = "Notes.Read.All" }
    @{ Resource = "Microsoft Graph"; Scope = "OnlineMeetingRecording.Read.All" }
    @{ Resource = "Microsoft Graph"; Scope = "OnlineMeetingTranscript.Read.All" }
    @{ Resource = "Microsoft Graph"; Scope = "OnlineMeetings.Read" }
)
foreach ($perm in $spfxPermissions) {
    Grant-PnPTenantServicePrincipalPermission -Scope $perm.Scope -Resource $perm.Resource
}
Finally, a Global Administrator grants admin consent for the publisher's multi-tenant app by opening https://login.microsoftonline.com/common/adminconsent?client_id=ed19c96c-a7c5-4dca-8b47-0899c406329f in a browser.
Verify: the API access page shows no pending AccessPoint requests.
Step 4: Use AccessPoint in SharePoint or Teams
SharePoint: edit or create a page, click +, search for AccessPoint, add the web part, and publish.
Teams: users find AccessPoint under Apps > Built for your org (search indexing can take 15 minutes to several hours after first install). Optionally pin it for everyone via Teams Admin Center > App setup policies by adding AccessPoint to Installed apps and Pinned apps.
Step 5: API URL configuration (usually automatic)
The web part discovers the API URL automatically. The AccessPoint API self-registers its address with the Realizer platform when it validates its license — within minutes of the App Service starting — and the web part fetches it from there. In most deployments there is nothing to do here.
Verify: reload the web part — the dashboard loads instead of the setup prompt. If the API was just deployed, discovery succeeds on the next page load after the first successful license validation.
Setting the API URL manually (optional)
You only need this to override discovery — for example, to pin the web part to a custom domain.
Option A — Setup panel. Open the web part, go to Settings > Setup, enter the API URL (the App Service URL from Step 1, e.g., https://app-accesspoint-contoso.azurewebsites.net), and click Save. The panel validates HTTPS before saving, and a manual URL takes precedence over discovery.

Option B — storage entity (PowerShell). Pin the URL in an AccessPoint_ApiUrl storage entity, which takes precedence over discovery. Since January 2026, SharePoint blocks property-bag writes on the no-script app catalog (message center MC1186368), so a SharePoint administrator must allow them once, tenant-wide, before the storage entity can be written:
# One-time (SharePoint admin): allow property-bag updates on no-script sites
Set-SPOTenant -AllowWebPropertyBagUpdateWhenDenyAddAndCustomizePagesIsEnabled $true

Connect-PnPOnline -Url "https://contoso.sharepoint.com" -Interactive
$appCatalogUrl = Get-PnPTenantAppCatalogUrl
Connect-PnPOnline -Url $appCatalogUrl -Interactive   # storage entities live on the App Catalog site

Set-PnPStorageEntity -Key "AccessPoint_ApiUrl" -Value $apiUrl -Description "AccessPoint API base URL"
Get-PnPStorageEntity -Key "AccessPoint_ApiUrl"       # verify
Step 6: Import a jurisdiction pack
Go to Settings > Jurisdiction packs, pick the pack for your jurisdiction (Canada ATIA, US FOIA, EU GDPR, and others), and click Import. The pack creates request types, extension reasons, choice fields, notification templates, and translations. Review and customize the imported items afterwards.
Step 7: Assign user roles
The first user to open AccessPoint is automatically granted the Administrator role — the only built-in role, which always resolves to every permission. Every other role is tenant-defined: importing a jurisdiction pack seeds ready-made roles (such as Request Coordinator, the de-facto access-and-privacy-officer role), and you can rename or reshape them under Settings > Roles & Permissions. Go to Settings > Manage Users, click Add User, search your directory, and assign at least one Administrator and one coordinator; Custodian, Contributor, Reviewer, and Reader access follows automatically from the work you assign people.
AccessPoint is now ready for use.
Updating AccessPoint
AccessPoint tells you when a newer version is available — there is nothing to subscribe to or poll manually:
- During routine license validation, the Realizer Platform reports the latest published AccessPoint version (the version most recently promoted to the customer release channel). No usage or case data is involved in this check.
- When the published version is newer than the one your API is running, administrators see an Update available notice on the dashboard and in Setup, showing the current and latest version numbers.
- When you are current (or running a pre-release build newer than the published release), Setup shows "Your AccessPoint API is up to date."
To apply an update:
- In Settings > Setup, click Deploy update to Azure. This opens the Azure portal with the latest ARM template — the same template used for initial deployment.
- Choose the Upgrade existing installation deployment type. This preserves operator-added application settings and leaves database access untouched; the database schema upgrades automatically on API startup (DacPac migration).
- Update the SPFx package: upload the latest
accesspoint.sppkgto your App Catalog (Step 2 above). Update the Teams app package in Teams Admin Center if a newaccesspoint-teams.zipwas released. - Revisit the Finish Setup page after upgrading — it idempotently grants any Graph permissions introduced since your original deployment.
- If you mirror the media worker image into your own registry, import the new version's tag before or right after the upgrade — the job pulls the tag that matches
apiVersion.
Upgrade mode carries operator-added application settings across the redeploy — for example Documents__EmailRenderEngine, a custom License__RealizerApiUrl, or RateLimiting__RequestsPerMinute (the per-user API request budget, default 1,200 per minute). Template-managed settings are re-asserted to template values.
Sample data for evaluation tenants. For demo and evaluation environments, a separate AccessPoint DevTools web part (
accesspoint-devtools.sppkg) can reset a tenant and seed jurisdiction-appropriate sample data — play users, requests, assignments, and generated documents — with a one-click Rebuild demo. It reuses the main app's API connection and declares its own API permissions (approve once under SharePoint Admin > Advanced > API access). Not for production: the destructive reset endpoints only activate when the App Service settingDevTools:Enabled=trueis set — deploy the package to dev/demo tenants only.
Teams notification data privacy (optional)
All request records, requestor PII, documents, and audit history live only in your own tenant. Notifications honour that too. AccessPoint delivers every notification on up to three channels, and two of them never leave your tenant: the in-app feed (served from your own API) and email/Outlook (sent from your own shared mailbox via Mail.Send). The Teams activity feed is the only channel that, in its default mode, POSTs a small payload to the Realizer Platform API — which exists only because Microsoft Graph requires an activity notification to be sent by the app that owns the Teams manifest. The publisher stores none of it and logs only the recipient + tenant GUIDs, and the same notifications still arrive by email and in-app. Two controls tighten or remove even this:
Minimise (a toggle). In Settings > Setup > Teams Notifications, turn on Minimise Teams notification content (privacy). The relayed payload then replaces the notification title/preview text and the acting user's name with neutral placeholders, so no assignment/task names, notification text, or personal names leave the tenant — only the activity type, request number, and record identifiers still transit so the toast can route and deep-link. The full text still shows in the in-app feed. No manifest change required. (Under the hood: the Notifications:TeamsMinimalPayload tenant setting.)
Eliminate (self-host the relay). A tenant that must send no notification data to the publisher can have its own API call Graph directly with its managed identity, so nothing reaches api.realizer.io:
- Grant
TeamsActivity.Send(application) to the API's managed identity and admin-consent it — Graph only lets the app that owns the Teams manifest send activity notifications, so the sending identity must match the manifest'swebApplicationInfo.id. - Point the Teams manifest at your own app. In
manifest.jsonsetwebApplicationInfo.idto your API app-registration / managed-identity client ID (replacing the publisher app id), leavingwebApplicationInfo.resourceas the SharePoint site domain. Upload the edited zip directly in Teams Admin Center — do not use SharePoint "Sync to Teams" (it rewriteswebApplicationInfo). - Switch the API to Direct relay — add the App Service setting
Notifications__TeamsRelayMode=Direct(default/unset =Publisher) and restart. The API now callssendActivityNotificationitself; the publisher enterprise-app grant is no longer needed for notifications. - Re-validate — send a test notification (confirm it deep-links) and confirm the Teams personal tab still signs in, since you changed
webApplicationInfo.id.
Direct relay keeps 100% of notification content in-tenant but means maintaining a customized Teams manifest and re-consenting when the app id changes. Most tenants that only need to suppress free text and personal names should use the Minimise toggle instead — no manifest change, and the notification still deep-links.
Multi-tenant deployment
Use this pattern when the Azure backend lives in a different Entra ID tenant than your Microsoft 365 tenant — a shared services team serving several business units, an MSP hosting for clients, or split Azure/M365 tenants for governance reasons. A single deployment can serve multiple M365 tenants: the API isolates data by the tenant ID in each user's token, with tenant-scoped database query filters and tenant-prefixed blob paths. Each M365 tenant still needs its own license, its own SPFx deployment and API permission approvals, and its own Graph credentials and notification mailbox.
Graph app registration. A managed identity only works in its home tenant, so create a single-tenant app registration in the M365 tenant (e.g., AccessPoint Graph Connector), grant it the same Graph application permissions listed in Step 1 with admin consent, then create a client secret and wire it to the App Service through Key Vault:
# In the M365 tenant: create the client secret
$secret = az ad app credential reset --id $appId --display-name "AccessPoint" --years 2 --query password -o tsv

# In the Azure subscription: store the secret and reference it from the App Service
az keyvault secret set --vault-name $vaultName --name "GraphClientSecret" --value $secret

az webapp config appsettings set --resource-group $ResourceGroup --name $appName --settings `
    "Graph__TenantId=$m365TenantId" `
    "Graph__ClientId=$appId" `
    "Graph__ClientSecret=@Microsoft.KeyVault(SecretUri=https://$vaultName.vault.azure.net/secrets/GraphClientSecret)"

az webapp restart --resource-group $ResourceGroup --name $appName
Never store the secret directly in App Service settings; the App Service managed identity needs the Key Vault Secrets User role on the vault. When all three Graph__* settings are present, the API uses the app registration; when absent, it falls back to the managed identity for same-tenant deployments.
Shared mailbox and application access policy. Create an unlicensed shared mailbox in the M365 tenant for email notifications, and scope Mail.Send so the app can only send from that one mailbox:
Connect-ExchangeOnline -Organization "contoso.onmicrosoft.com"

New-Mailbox -Name "AccessPoint Notifications" -Alias "accesspoint-noreply" -Shared

New-DistributionGroup -Name "AccessPoint Mail Senders" -Type Security -ManagedBy "admin@contoso.com"
Add-DistributionGroupMember -Identity "AccessPoint Mail Senders" -Member "accesspoint-noreply@contoso.com"

New-ApplicationAccessPolicy -AppId $appId -PolicyScopeGroupId "AccessPoint Mail Senders" `
    -AccessRight RestrictAccess -Description "AccessPoint may send only from the shared mailbox"

# Verify (propagation can take up to 30 minutes)
Test-ApplicationAccessPolicy -AppId $appId -Identity "accesspoint-noreply@contoso.com"   # expect: Granted
Test-ApplicationAccessPolicy -AppId $appId -Identity "someother@contoso.com"             # expect: Denied
Each M365 tenant then repeats Steps 2–5 (apps, approvals, API URL — the same API URL serves all tenants). Teams activity feed notifications additionally require admin consent for the Realizer enterprise application and the Teams app installed for users; see Initial Setup for details.
Troubleshooting
The web part shows "Token request previously failed". This is SharePoint Framework's cached token failure: the web part's first attempt to get an access token failed, and SPFx re-throws the message for the rest of the browser session without retrying — so it keeps appearing after the cause is fixed until the page session is fully refreshed. Almost always seen on a new tenant whose pending API access requests have not been approved. Fix, in order: (1) in SharePoint Admin Center → Advanced → API access, approve every pending request from the AccessPoint package — the critical one is the AccessPoint / Realizer API access_as_user scope, without which every call fails; the Graph scopes for the Add-from-Microsoft-365 pickers can be approved at the same time. (2) If approval succeeds but tokens still fail, check Entra admin center → Enterprise applications for the app and any Conditional Access policy blocking it, and confirm a Global or Application administrator did the approval. (3) Fully refresh the browser — close the tab and open the page again, or sign out and back in; a soft navigation is not enough. The same message appears when third-party cookies are blocked in a private window, because the hidden token iframe fails — retry in a normal window before deeper diagnosis.
The "AccessPoint X is available (you're on Y)" banner persists after deploying the update. With run-from-package hosting, the running App Service keeps the old package mounted until the site recycles. If the deployment's own recycle did not land, the previous build keeps serving and the banner is accurate. Restart the App Service (portal → App Service → Restart, or az webapp restart -g <rg> -n app-accesspoint-<tenant>): the new build mounts on start, validates its licence, and the banner clears on the next page load. Templates published after 2.0.73 re-assert the app settings with a per-deployment stamp after the package is staged, which always triggers the recycle, so this only occurs when deploying with an older template.
Redeploying the template fails with RoleAssignmentExists. Azure allows one role assignment per principal, role, and scope. The template's own grants are deterministically named and idempotent, so this error means the same grant was also created outside the template — typically by hand in the portal or with az role assignment create (for example granting yourself Storage Blob Data Reader on the vulnerability-assessment storage account to view scan results, which current templates grant to the deployer automatically). Delete the manually created assignment named in the error, then redeploy; the template recreates the identical grant under its managed name, so no access is lost:
# The error's ID is the assignment name
az role assignment list --all --query "[?name=='<id-from-error>']"
az role assignment delete --ids <full-assignment-resource-id>
Grants for additional people are unaffected — the template manages only its own principals (the API identity, the SQL server identity, and the deployer).
Rollback and operations
Standard Azure mechanisms cover rollback: redeploy a previous API package from the App Service Deployment Center history, restore Azure SQL with point-in-time restore (up to 35 days), and re-upload a previous versioned .sppkg to the app catalog. Jurisdiction pack imports are additive and are reverted via database restore. For the full operational runbook — detailed rollback procedures, monitoring, and maintenance tasks — contact our support team.