
Initial setup — API base URL, Azure deploy/update, email and Teams notifications, the app link, delivery health, and the first-run sequence
Last updated: August 06, 2026 by Steve
Initial Setup
Settings > Setup is the first screen you configure after deployment. It connects the SharePoint web part to your Azure back end, launches the Azure deploy/update flow, and controls how notifications reach users. You must have the Administrator role to open it.
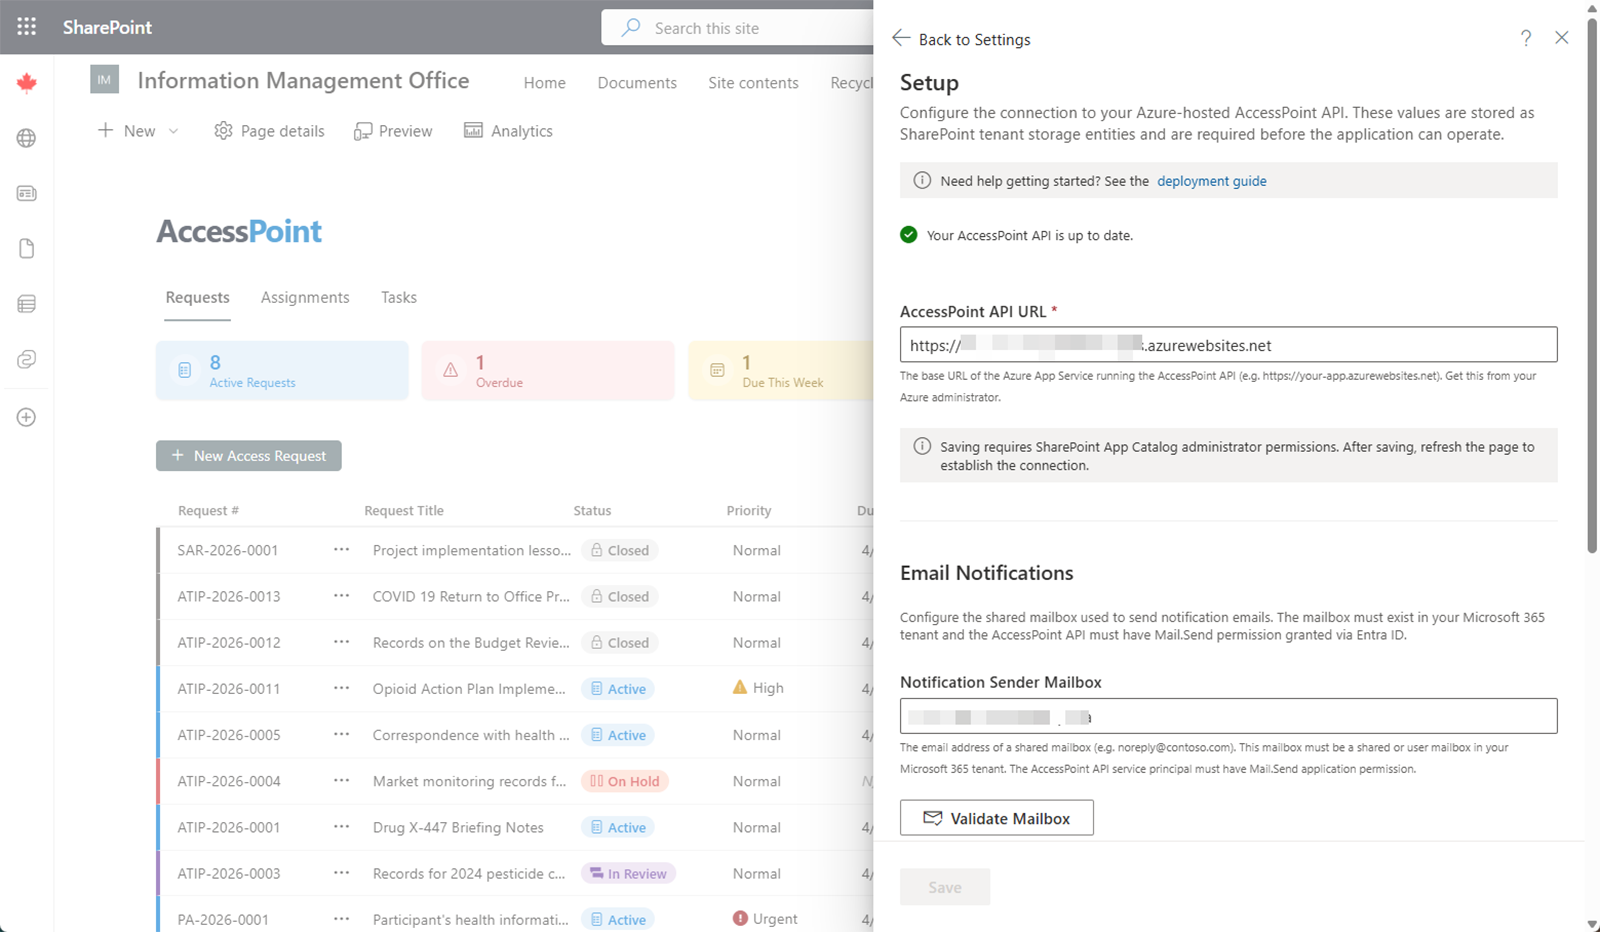
API base URL (usually automatic)
The API base URL is the address of your AccessPoint API service in Azure. The web part normally discovers it on its own: the API self-registers its public URL with the Realizer platform when it validates its license (within minutes of the App Service starting), and the web part fetches it from there — usually there is nothing to do here.
To pin the URL manually instead (for example, a custom domain):
- API URL — Enter the App Service URL of your AccessPoint API (for example,
https://app-accesspoint-contoso.azurewebsites.net). It must use HTTPS. - Click Save. AccessPoint validates that the URL uses HTTPS before storing it, and a manual URL takes precedence over discovery.
Azure deploy and update
The Setup screen is also the entry point for provisioning and updating the Azure back end:
- Deploy to Azure launches the ARM/Bicep template in the Azure Portal, pre-loaded so you can provision the App Service, SQL database, and storage into your own subscription.
- Deploy update to Azure re-runs the same template, in Upgrade mode, against an existing deployment to apply new versions.
Both are covered end to end in the Deployment Guide; use it for the full step-by-step, including SPFx and Teams app installation.
Update availability
AccessPoint tells you when a newer version is available — nothing to subscribe to or poll manually. During routine license validation, the Realizer Platform reports the latest published AccessPoint version (no usage or case data is involved), and Setup shows the result:
- Update available — shown here (and on the dashboard) when the published version is newer than the one your API is running, with the current and latest version numbers.
- "Your AccessPoint API is up to date." — shown when you're already current, or running a pre-release build newer than the published release.
When an update is available, click Deploy update to Azure to open the same ARM template used for initial deployment, pre-set to Upgrade existing installation — see Updating AccessPoint in the Deployment Guide for the full procedure.
Optional AI capabilities
The deploy/update flow also exposes four optional capabilities, none required to run AccessPoint. Three — AI Assist, AI Search, and Document Intelligence — are off unless you turn them on at deploy time; the Copilot capture permission is granted by default but can be opted out. They are covered in full in the Deployment Guide.
- Deploy AI Assist — provisions an Azure OpenAI resource in your own Azure subscription and region (managed-identity auth, no API keys). Billing is pay-per-use, so an idle tenant pays about $0. Deploying it enables the AI Assist features, each of which stays individually switchable under Settings > Features. Every AI output is a suggestion or an editable draft — a person always decides.
- Deploy AI Search — adds Azure AI Search, enabling full-text search of document content and, when AI Assist is also deployed, semantic search. If documents predate the resource, run the Administrator-only Index existing documents sweep under Settings > Setup > Document content search.
- Deploy Document Intelligence — adds Azure AI Document Intelligence for OCR: scanned, image-only documents get their text read so they participate in content search, duplicate detection, AI summaries, and redaction suggestions. Pay-per-page billing.
- Copilot capture permission — the tenant-wide
AiEnterpriseInteraction.Read.AllGraph permission is granted by default so custodians can capture Copilot interaction history out of the box. Least-privilege tenants can opt out with-DisableCopilotCaptureon the deployment script (orgrantCopilotCapturePermission=falseon the ARM/Bicep template), and can revoke the app role in Entra ID at any time.
Notification settings
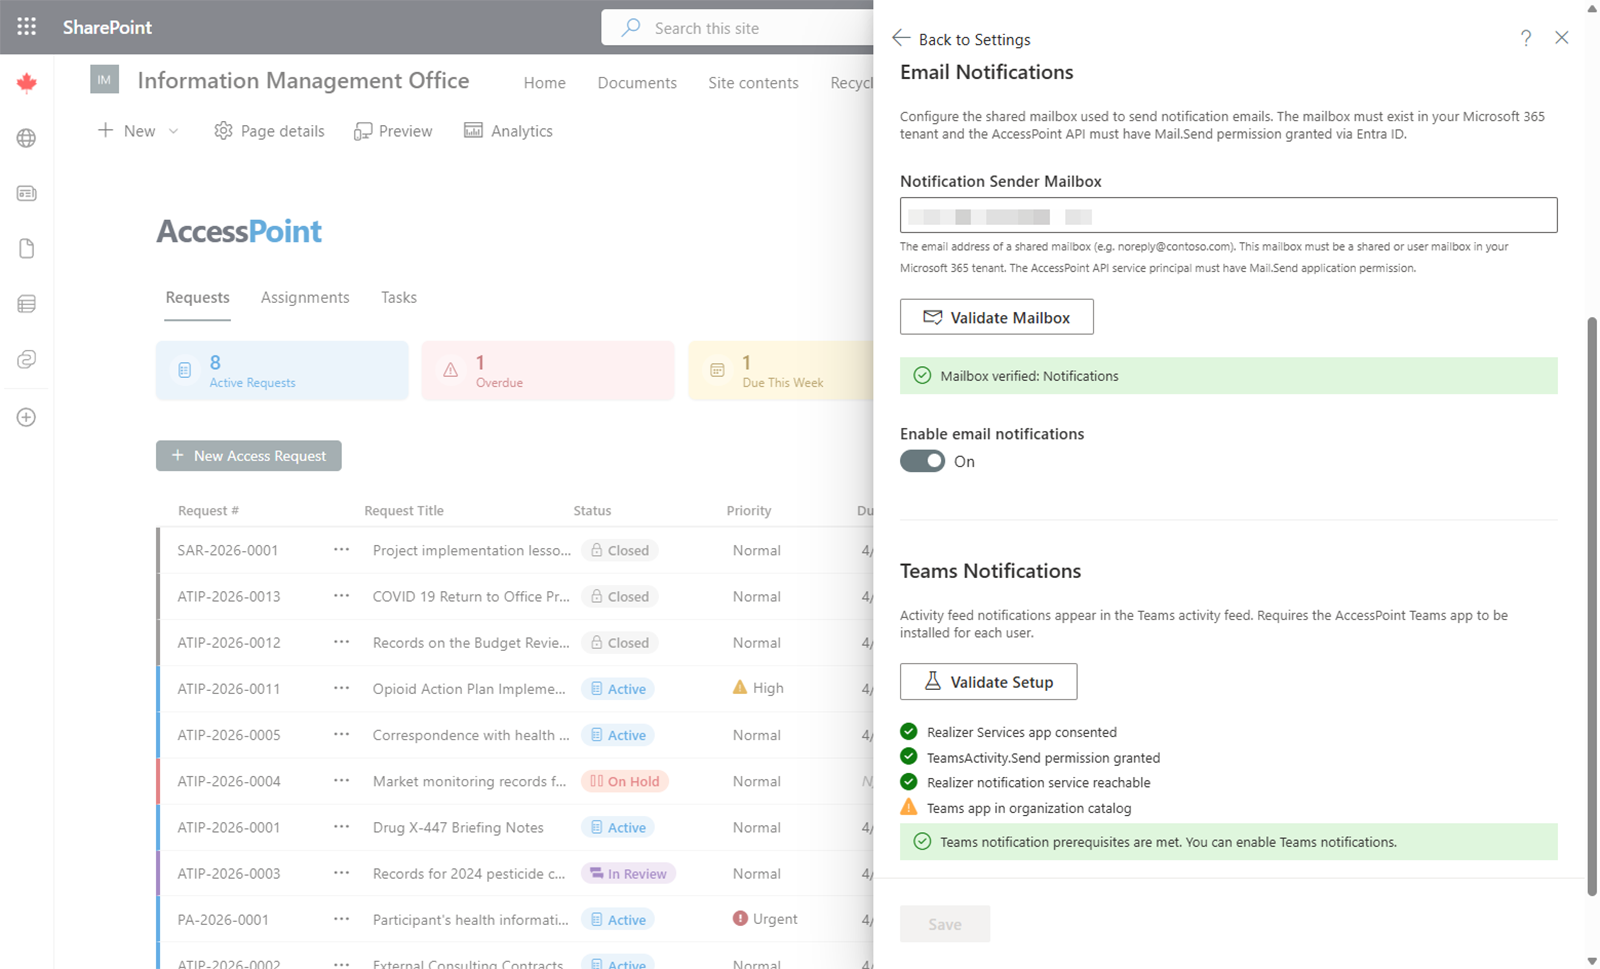
Email notifications
- Enable/disable email notifications — Toggle email on or off for the whole system.
- Notification sender mailbox — Set the address notifications are sent from. This must be a shared mailbox or user mailbox in your Microsoft 365 tenant (for example,
noreply@contoso.com). - Click Validate Mailbox to confirm live against Microsoft Graph that the API service principal can send from the specified mailbox.
Teams activity feed notifications
Teams activity-feed notifications are on by default. When enabled, users receive notices in their Microsoft Teams activity feed in addition to (or instead of) email. Toggle them off in this panel if you don't want them.
Run the Teams setup validation check to confirm the app is registered, the activity-send permission is granted, the publisher API is reachable, and the app is present in your catalog.
App link
Set the app link that powers the "Open in AccessPoint" button in notification emails. It is auto-detected when an administrator opens the app; override it here if you want the button to target a specific page. When neither an auto-detected nor a manual link is set, the link line is simply omitted from emails.
Notification delivery health
A notification delivery health strip shows sent / failed / skipped counts for the last 7 days, with the most recent attempts listed — so a silent mail failure is visible without leaving the panel.
Required permissions
These Microsoft Graph permissions must be granted to the relevant service principals for notifications to work.
API service principal
| Permission | Purpose |
|---|---|
Mail.Send |
Send email notifications |
User.ReadBasic.All |
Resolve basic user information and validate the sender mailbox |
TeamsAppInstallation.ReadForUser.All |
Check Teams app installation status |
Application.Read.All |
Read application registrations |
AppCatalog.Read.All |
Read the Teams app catalog |
Realizer multi-tenant enterprise app
| Permission | Purpose |
|---|---|
TeamsActivity.Send |
Send Teams activity feed notifications |
AppCatalog.Read.All |
Read the Teams app catalog |
User.Read |
Read basic user profile |
These permissions are configured during the deployment process.
First-run sequence
Once Setup is saved, complete these steps to make AccessPoint usable:
- Import a jurisdiction pack. Go to Jurisdiction Packs, choose the pack for your jurisdiction (for example, Canada ATIA, US FOIA, or EU GDPR), and click Import. This seeds request types, statuses, exemptions, legal authorities, notification and correspondence templates, calendars, and translations in one step.
- Assign user roles. The first user to open AccessPoint is bootstrapped with the Administrator role — the only built-in role. Importing a jurisdiction pack seeds the other roles your office needs (such as Request Coordinator). In Manage Users, add users from your directory and assign roles — at least one more Administrator for continuity and at least one coordinator to process requests; custodian, contributor, reviewer, and reader access follows automatically from assigned work.
- Verify calendars and languages. Confirm your Calendars have the correct weekend days, jurisdiction, and statutory holidays that drive due-date math, and that your Languages list has the right active languages and default. The pack sets sensible defaults, but these determine your deadlines and every translatable field, so check them before going live.
AccessPoint is now ready for use.